#Tutorial on GPU Computing
Explore tagged Tumblr posts
Visit Tumblr Blog
Explore Tumblr blogs with no restrictions, modern design and the best experience.
Last Seen Tumblr Blogs


Fun Fact
Tumblr has been banned in Indonesia for providing people with access to pornographic content.
Text
Busy week
I had a week full of software development. I slacked off on a bunch of other activities, such as physical exercise ... and blogging. So now I'm overdue for progress report...
Recall that last Saturday I completed Chapter 28 of the Java Vulkan tutorial and blogged about it, reporting just 2 chapters to go.
Chapter 29 was on multisample anti-aliasing (MSAA). I got that working on Sunday without much difficulty (8df30b5). However, it's a subtle effect (unless you have humongous pixels), so it didn't justify posting yet another screenshot of the Viking room.
Chapter 30 of the tutorial is the bonus chapter on compute shaders. That's a neat trick, but not relevant to my immediate plans, which involve turning the V-Sport project into a graphics engine.
I realized that the tutorial code makes simplifying assumptions that are inappropriate for a graphics engine: a single 3-D geometry with pre-baked lighting, mesh must be composed of triangles, a stationary viewpoint, no user input, and so on.
With this in mind, I abandoned the tutorial and undertook a massive restructuring of the code, to allow scenes containing multiple geometries (or no geometries at all). Along the way, I:
implemented a texture cache, to save memory and CPU cycles in case an application requests the same texture many times (2eaf093),
changed the naming scheme for shaders to match my OpenGL graphics engine,
made a plan for multiple shaders. In every V-Sport shader, vertex buffers will be laid out in the same order, the same uniforms will be defined, and any given uniform will have the same buffer offset everywhere. These restrictions simplify the implementation, while leaving possibilities to optimize later if they prove inefficient.
considered the possibility that a window might migrate from one GPU to another. If this ever happens, all application-visible "device resources" (textures, shader programs, and vertex buffers) can be silently updated, recreating their underlying Vulkan resources (images, shader modules, and mappable buffers) from scratch. I haven't seen this scenario in practice, but the time I spent thinking about it led me to a cleaner design.
split the uniforms into 2 buffers, one for global uniforms (such as camera orientation) that are the same for every 3-D geometry, and another for per-geometry uniforms (such as model orientation). Seems logical, ought to be more efficient, but wow was it tough to get right!
deferred loading of shader modules until they are actually needed for rendering (9397178),
altered when command buffers get recorded. In the tutorial, each command buffer gets recorded exactly once, during initialization. In my engine, a command buffer gets re-recorded for every frame. Dynamic command recording allows the set of geometries being rendered (and all their properties) to vary from frame to frame.
All this work cleared a path for rendering multiple objects (3035e15) earlier this evening. Tomorrow I'll play around and (hopefully) post a screenshot that's both interesting and relevant.
#making progress#software engineering#vulkan#textures#tutorial#shaders#java#gpu#3d graphics#accomplishments#coding#software development#software design#computer graphics
2 notes
·
View notes
Text
DXVK Tips and Troubleshooting: Launching The Sims 3 with DXVK
A big thank you to @heldhram for additional information from his recent DXVK/Reshade tutorial! ◀ Depending on how you launch the game to play may affect how DXVK is working.
During my usage and testing of DXVK, I noticed substantial varying of committed and working memory usage and fps rates while monitoring my game with Resource Monitor, especially when launching the game with CCMagic or S3MO compared to launching from TS3W.exe/TS3.exe.
It seems DXVK doesn't work properly - or even at all - when the game is launched with CCM/S3MO instead of TS3W.exe/TS3.exe. I don't know if this is also the case using other launchers from EA/Steam/LD and misc launchers, but it might explain why some players using DXVK don't see any improvement using it.
DXVK injects itself into the game exe, so perhaps using launchers bypasses the injection. From extensive testing, I'm inclined to think this is the case.
Someone recently asked me how do we know DXVK is really working. A very good question! lol. I thought as long as the cache showed up in the bin folder it was working, but that was no guarantee it was injected every single time at startup. Until I saw Heldhram's excellent guide to using DXVK with Reshade DX9, I relied on my gaming instincts and dodgy eyesight to determine if it was. 🤭
Using the environment variable Heldhram referred to in his guide, a DXVK Hud is added to the upper left hand corner of your game screen to show it's injected and working, showing the DXVK version, the graphics card version and driver and fps.

This led me to look further into this and was happy to see that you could add an additional line to the DXVK config file to show this and other relevant information on the HUD such as DXVK version, fps, memory usage, gpu driver and more. So if you want to make sure that DXVK is actually injected, on the config file, add the info starting with:
dxvk.hud =
After '=', add what you want to see. So 'version' (without quotes) shows the DXVK version. dxvk.hud = version

You could just add the fps by adding 'fps' instead of 'version' if you want.

The DXVK Github page lists all the information you could add to the HUD. It accepts a comma-separated list for multiple options:
devinfo: Displays the name of the GPU and the driver version.
fps: Shows the current frame rate.
frametimes: Shows a frame time graph.
submissions: Shows the number of command buffers submitted per frame.
drawcalls: Shows the number of draw calls and render passes per frame.
pipelines: Shows the total number of graphics and compute pipelines.
descriptors: Shows the number of descriptor pools and descriptor sets.
memory: Shows the amount of device memory allocated and used.
allocations: Shows detailed memory chunk suballocation info.
gpuload: Shows estimated GPU load. May be inaccurate.
version: Shows DXVK version.
api: Shows the D3D feature level used by the application.
cs: Shows worker thread statistics.
compiler: Shows shader compiler activity
samplers: Shows the current number of sampler pairs used [D3D9 Only]
ffshaders: Shows the current number of shaders generated from fixed function state [D3D9 Only]
swvp: Shows whether or not the device is running in software vertex processing mode [D3D9 Only]
scale=x: Scales the HUD by a factor of x (e.g. 1.5)
opacity=y: Adjusts the HUD opacity by a factor of y (e.g. 0.5, 1.0 being fully opaque).
Additionally, DXVK_HUD=1 has the same effect as DXVK_HUD=devinfo,fps, and DXVK_HUD=full enables all available HUD elements.
desiree-uk notes: The site is for the latest version of DXVK, so it shows the line typed as 'DXVK_HUD=devinfo,fps' with underscore and no spaces, but this didn't work for me. If it also doesn't work for you, try it in lowercase like this: dxvk.hud = version Make sure there is a space before and after the '=' If adding multiple HUD options, seperate them by a comma such as: dxvk.hud = fps,memory,api,version
The page also shows some other useful information regarding DXVK and it's cache file, it's worth a read. (https://github.com/doitsujin/dxvk)
My config file previously showed the DXVK version but I changed it to only show fps. Whatever it shows, it's telling you DXVK is working! DXVK version:


DXVK FPS:

The HUD is quite noticeable, but it's not too obstructive if you keep the info small. It's only when you enable the full HUD using this line: dxvk.hud = full you'll see it takes up practically half the screen! 😄 Whatever is shown, you can still interact with the screen and sims queue.

So while testing this out I noticed that the HUD wasn't showing up on the screen when launching the game via CCM and S3MO but would always show when clicking TS3W.exe. The results were consistent, with DXVK showing that it was running via TS3W.exe, the commited memory was low and steady, the fps didn't drop and there was no lag or stuttereing. I could spend longer in CAS and in game altogether, longer in my older larger save games and the RAM didn't spike as much when saving the game. Launching via CCM/S3MO, the results were sporadic, very high RAM spikes, stuttering and fps rates jumping up and down. There wasn't much difference from DXVK not being installed at all in my opinion.
You can test this out yourself, first with whatever launcher you use to start your game and then without it, clicking TS3.exe or TS3W.exe, making sure the game is running as admin. See if the HUD shows up or not and keep an eye on the memory usage with Resource Monitor running and you'll see the difference. You can delete the line from the config if you really can't stand the sight of it, but you can be sure DXVK is working when you launch the game straight from it's exe and you see smooth, steady memory usage as you play. Give it a try and add in the comments if it works for you or not and which launcher you use! 😊 Other DXVK information:
Make TS3 Run Smoother with DXVK ◀ - by @criisolate How to Use DXVK with Sims 3 ◀ - guide from @nornities and @desiree-uk
How to run The Sims 3 with DXVK & Reshade (Direct3D 9.0c) ◀ - by @heldhram
DXVK - Github ◀
106 notes
·
View notes
Note
hi hi! I've been looking at your blender art and its all been super fascinating to see! from your series to your wip and progress pics, its been kinda inspiring me to also give blender a go! although... i only have a laptop at my disposal, and i'm not sure if it could handle the power of blender, what do you think? should I proceed with caution, or leave it for later?

Apologies on the following wall of text, but here's a pretty lengthy explanation of what you'll need to keep in mind. TL,DR: You sure can, but you'll have to think about optimization!
So, the thing to be careful about with using a laptop that isn't very powerful relates to complexity and polygons, followed then by rendering. If you can keep the complexity down, you totally can use a lower power rig, so long as your willing to wait for render times. Even if you can't do much now, Blender has a learning curve, so starting now is better than waiting for a better PC anyways.
If you make simple models without a million polygons, and they're just like props without bending or other mechanics, you totally can! If anything, making props is both fun and great to learn from! Making a UV map for a box is WAY easier than making one for a VRChat model. At least to gain some traction, try making some props from around the house or making simple scenes from Youtube tutorials, your laptop can totally handle that with simple lighting physics.
For more complex things, the name of the game is: Optimization.
If you wanna make models on a lower power PC, I highly suggest studying VRChat model makers or game model makers. Game models are purposely made to be lower poly and easier on computers, and the textures tend to do a lot of work, but even those can be made simpler. If you design with optimization as your goal, you'll get pretty far even on a low power PC, but it requires an optimization mindset, you can't just willy-nilly add polygons to make a shape if you intend to do things like rig it and make it move.
Your render times may be slower, and it may make your computer chug a bit, but unless you get a RAM or GPU RAM error saying you don't have enough, you just have to be patient, and even with those errors, reducing your model or render quality can fit the difference. This is honestly the only hard cap on if your laptop with survive it's Blender experience, and there are ways to avoid it.
Now, your limitations are as follows: you can't just mindlessly model polygons on complex rigs or props, and you won't be able to have a ton of high-quality models in a single render.
Xaphar is actually very un-optimized, he makes my computer (which is kinda strong) chug a bit unless I turn off a few of his settings to only show in the final render. Civ, Livic, and Lye are way better optimized, so they result in fewer issues and are way easier to work with. Luckily, with my stronger computer, I can afford to be less optimized as the computer can just handle it for Xaphar, but on a laptop, you won't have the resources to not care. Being mindfully optimized will be your goal if you're going for a big scene or lots of character modelling.
Optimized props will allow you to add more to your scenes too. Too many high-quality objects will run you into a RAM or GPU RAM limit and it won't render. If you go all the way to rendering, try and keep your scenes limited, put a wall behind them to cut off the background, keep the props to well-optimized or don't use many. A lower power computer is just an excuse to cheat more! And there are many optimization cheats!
18 notes
·
View notes
Note
Since you don't see many edits here, and i am a dumbass in editing, could you make a tutorial on it? Like: what apps should we use, what should or shouldn't do, devices, etc. Since i personally worship your editing prowess, i couldn't help myself but ask for your guidance sensei. 🙇♀️
I don't use a "special device" to make my edits, just a computer which can run a videoediting software and Wallpaper Engine correctly (in my case it's an Apple Mac Pro 4,1 from 2009 with upgraded RAM and GPU, and also with Windows 10 installed on it, but that's not important). My server pc build out of my spare parts, and it's serves as a network bridge, and a file storge (like a NAS, or something) to store my personal files, like the assets for the edits on HPP. The way I make my edits, is a different story. I like to put the charaters in different scenarios to make the edit more enjoyable. I usually chose one image from my pre-granarated ones, or I use (if i see a, as i call an edit "suspicious" image here on Tumblr or X) an image from my "Likes", or if I can't find any which is good for the scanario in my head I generate one using PixAI's Ebora Pony XL AI model. Than if I have an image, I put together a static version of the edit in Paint.NET (PaintdotNET). Here I cut down the unnecessary and the broken (weirdly generated hands, .etc) parts of the image, and I remove the background if I'd like to use a different one. Than I chose a stethoscope png what are suitable for the edit, but I recently using the hand with stethoscope one which you can see in my recent edits. I also make some barely visble changes to the main image and the stething image. If it's done, and looks good I save them (the base image, the background, and the steting png separately) in a folder. After that it's time to "animate" the edit, which is just using the Wallpaper Engine's built in Shake effect, if that part is done, I record the animated soundless edit using OBS, which is usually a 5-6 minutes raw mp4 file. Than I put the raw recording into the video editor which is my case is the Wondershare Filmora X. I chose one of the heartbeat and bearthing audios from my server (if it's needed I modify it a bit in Audacity), and speed them up to mach with the animation. I make the breathing way quieter to have the heartbeat in focus, also i duplicate the hb sound to make a stereo effect, which means the I make the left side a bit louder and add more bass to it than the right side, which make a really good heart pulse effect (ROLL CREDITS). Also in here I add some video effects, cut down the unnecessary parts, I cut down the video to 2 minutes to become uploadable for X, than it's time to export it. After I exported the final edit, i check it for mistakes and I fix them if i find any, and the fixed version gonna be uploaded to Tumblr and X. This whole process is 2+ hours usually, but it's could be more for longer and more complex edits. But you doesn't need to follow my way to make edits, if you ever used a photo editor and a video editor before, and you know how put a transparent png on an image, and a greenscreen video on another one, you good to go. There is a lot of ways you can make an edit, so you can chose one which are suitable for you. If you still need help, you can join the Cardio Editor's Hub, there are lot of other people who gladly gives you some tips and tricks. Good luck, have fun! :D
11 notes
·
View notes
Text
Virtual Photography Process
I got an ask that I posted by accident before being ready, so I'm going to make this a post I suppose fmdlksg Anon was asking about my Reshade Preset for Cyberpunk and what my VP process is, so here it is!
Anon, I don't quite have a VP process. Not in a trademark way anyway. My VP varies wildly across the years and generally speaking I just go with the vibe I feel at the moment!
I've had phases where I would barely do any post-processing at all and only rely on heavy Reshade, I had phases where I'd do some minor color tweaking and add a lot of effects like dust and sparks, and my current one where I do pretty much all my color tweaking in post-process and only really use light Reshade to sharpen the image and make colors pop a bit.

My current Reshade is a tweaked version of a friend's preset. I have an average rig, don't have any Fancytracing, so Reshade is mostly there to sharpen the image, deepen the colors and try to compensate for my GPU's limitations. I forgot to use Otis DOF for this example, but nowadays I don't use any Reshade DOF, and rely only on Otis'. I also only use Otis lights because I can control what each light does a little better than AMM lights, but I used AMM lights a lot when I first was VPing.
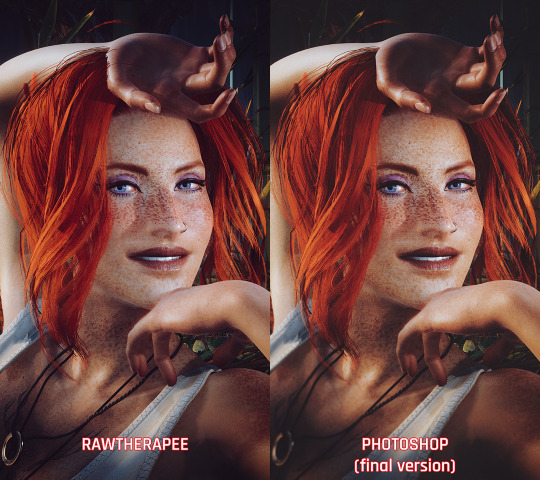
It's when the game's closed that I have my fun with colors!
I do my coloring on RawTherapee, which is a free Lightroom. Mostly I make use of the Film Simulation, sometimes layering multiple, sometimes using only one.
I then move to Photoshop which is my last stop and my "correction" phase. I have a huge library of actions and gradient maps I paw around for any last coloring (specially making shadows more matte and less defined), tweak contrast/brightness, and add some blurring and noise (beloved).

I probably have actions/gradient posts reblogged on my repository blog (@halkuonn), I can't point you to a single place because I've been dragging these around for over a decade and across at least 3 computers...
Honestly, don't get too attached to a single workflow with your VP. VP is art and art is meant to be a creative outlet, if you start putting too many rules and step by steps on your personal workflow, you'll probably get frustrated fast.
My current workflow is way lengthier than how I took some of my older VP, but that's because I feel like doing it. I don't necessarily feel like it's better or worse, it's just a different way I've been doing stuff and having fun with VP.

This is from 2022 - I wasn't using Otis Freecam, relied on AMM Lights, and did some mild/low post-processing - things like making the shadows a little bit more purple with Color Balance, and adding A LOT of blur manually because I didn't know how to use any of the DOF shaders. I was using Pinky's Preset back then.

This is from 2023 - the fuck it we ball era. This has like... 0 post-processing. I wasn't using Otis DOF (I don't think it existed yet), but I was already using Otis Lights learned to use the DOF shaders. The only thing I was doing for post-processing is add Noise and slap my signature (which this one doesn't even have lmao). I already had a new Reshade preset from my friend, but didn't really tweak any of it.

From this year! I still wasn't using RawTherapee a lot, but it was the start of my "I'm going to do everything in post-processing" era, with shadows not as dark/contrasted and everything a bit hazy.
So yeah! Don't stress about having a single workflow, or the best workflow, or even the most appropriate Reshade. For me the less I try to be biblical about my VP process, the more I enjoy taking it, and in turn the more satisfied I am with the results.
If you want more of a tutorial, I can try?? doing one?? but really the only thing I have been consistently doing with my VP all these years is slapping some extra blur and adding Noise on PS.
Hope this helps or at least provides some software recommendations / process ideas though!
26 notes
·
View notes
Text
LEARN ABOUT IMAGE PROCESSING
Image fusion is a process where two or more images are combined to create a single, more informative or visually enhanced image. This technique is used in various fields like photography, remote sensing, medical imaging, and computer vision.

GET PARTICLE IMAGE PROCESSING VIDEO TUTORIAL 🦄
The goal of image fusion is to enhance the overall quality of the final image by combining information from multiple sources while retaining the most relevant details.
Feature-Level Fusion: Instead of combining pixel values, this method focuses on merging the features extracted from images. It's often used in computer vision for object recognition and tracking.
Libraries and Frameworks for Machine Learning Image Processing:
OpenCV-Python is a library of Python bindings designed to solve computer vision problems.
Huge library of image processing algorithms
Open Source + Great Community
Works on both images and videos
Java API Extension
Works with GPUs
Cross-Platform
youtube
#3d printing#ppt image process#image description in alt#image archive#image described#image processing#3d image processing#artificial intelligence#artificial image#techno animation#100 days of productivity#technoland expert#technoland facts#technoart#techno design#Youtube
8 notes
·
View notes
Note
Hii! Question, your game runs smooth with all the mods? I ask because I have a normal laptop, and have been able to install a few mods, but with some of them like unique tav it just crashes. Now I'm getting a gaming laptop for Christmas, but I don't know if is an issue with the mod, or it's just that my computer is not suited for gaming.
PS: I love your characters, they're very pretty 💕
I have a beast of a gaming PC quite honestly because I use it to stream on twitch. So I'm able to run quite a few mods on my game with little to no problems. But laptops aren't built for stuff like that so I can totally see the game getting too much for the GPU and crashing. It happens for me sometimes, albeit rarely. And it's usually because it's loading the sheer amount of modded stuff in the tutorial chest lol
9 notes
·
View notes
Text

Beginner Blender Tutorial Basic Render: Part Three (Adjusting Render Settings, Adding Lights, and Rendering!)
(Continuing from Part Two)
Step 1: Adjusting Render Settings
I exclusively render in Cycles, and though I'll be doing some Eevee runs for the sake of tutorials, I'm going to share what I know today and show you how to set up a Cycles render the way I do
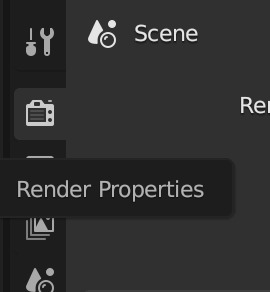
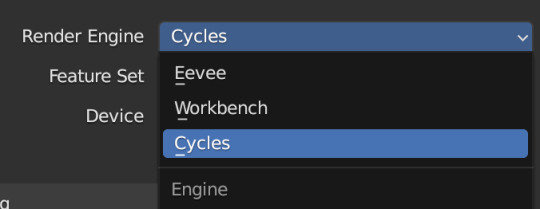
Navigate to Render Properties and select "Cycles" in the Render Engine dropdown

If you have an older system, leave CPU selected If you have a newer or beefier computer, select GPU complete I render on a MacBook Pro, so I'll select GPU
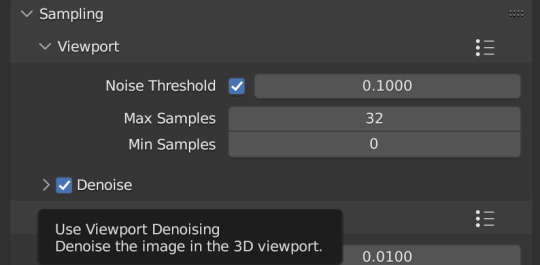
Under Sampling -> Viewport, make sure you click on the Denoise, this will clean up our render preview so we can more easily see what the final result will look like

Under the same Sampling tab, adjust your Max Samples to match mine (32 in the viewport and 128 in the render window, this will speed up your render time)
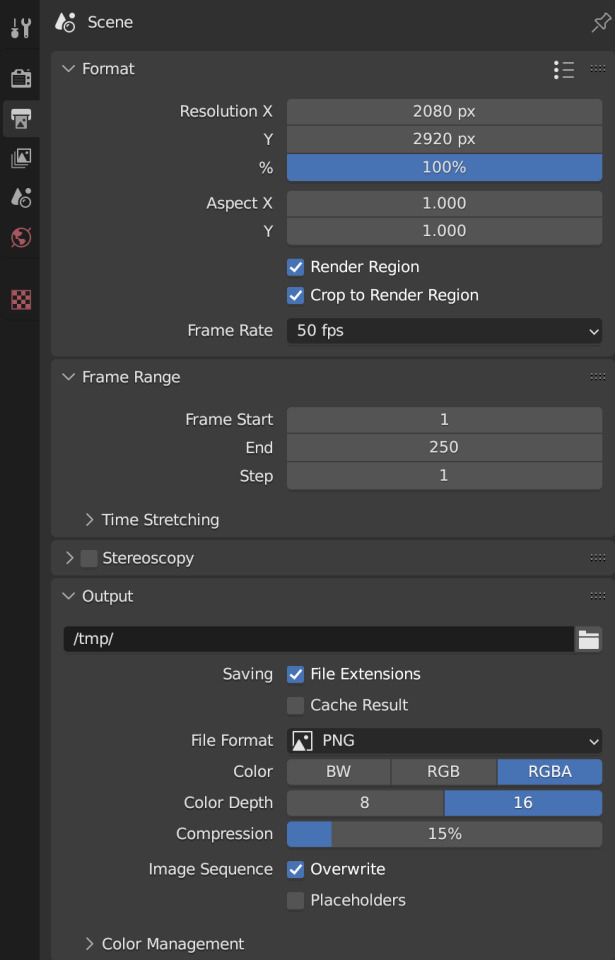
Click into Output Properties and select "Render Region" and "Crop to Render Region", and change the frame rate to 50fps In the Output tab, change the Color Depth to 16 Nothing will change in our 3D Viewport, but the settings are ready to go
Step 2: Adding Lights
Right now, if we were to change our mode to Rendered, we'd have nothing but a black box. This is because our sim is in a cube with no light source Let's add some lights! For portraits, I like to use a combination of Spot and Point lights You add in lights the same way you add in the camera and the cube, either by clicking "Add" in the top menu or with Shift+A on your keyboard and selecting Light -> Spot or Point I'm going to add a Spotlight first I like to add in lights in Rendered view, but be careful using rendered view as it ups the chances that your Blender will crash

I added in a spotlight but it appears that nothing happened Objects are added into Blender at the Cursor point. I never adjusted mine so it's at the center of the axis, meaning below my sim's feet and outside of the box Using G and X,Y,Z, I'm going to move my spotlight up
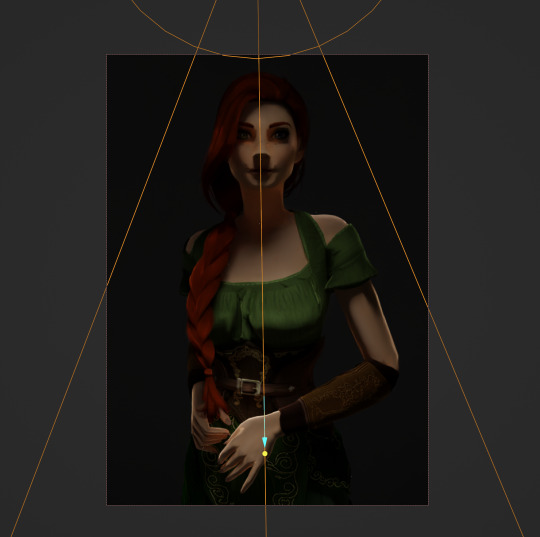
Now the light is above her, but I want it shining on her, so I'm going to rotate it forward Rotate objects using the R key and X,Y,Z directions on your keyboard
That's not bad, but I want more dynamic light. I'm going to add two more spotlights for 3 point lighting
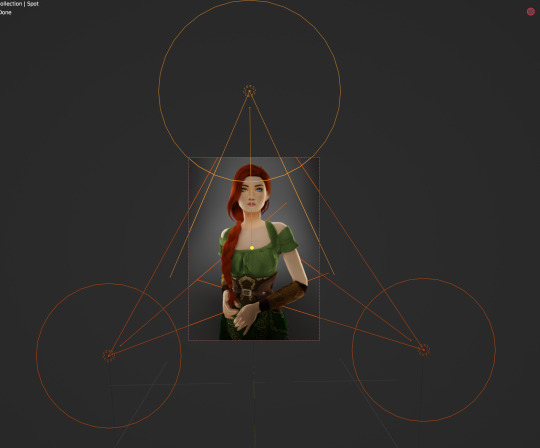
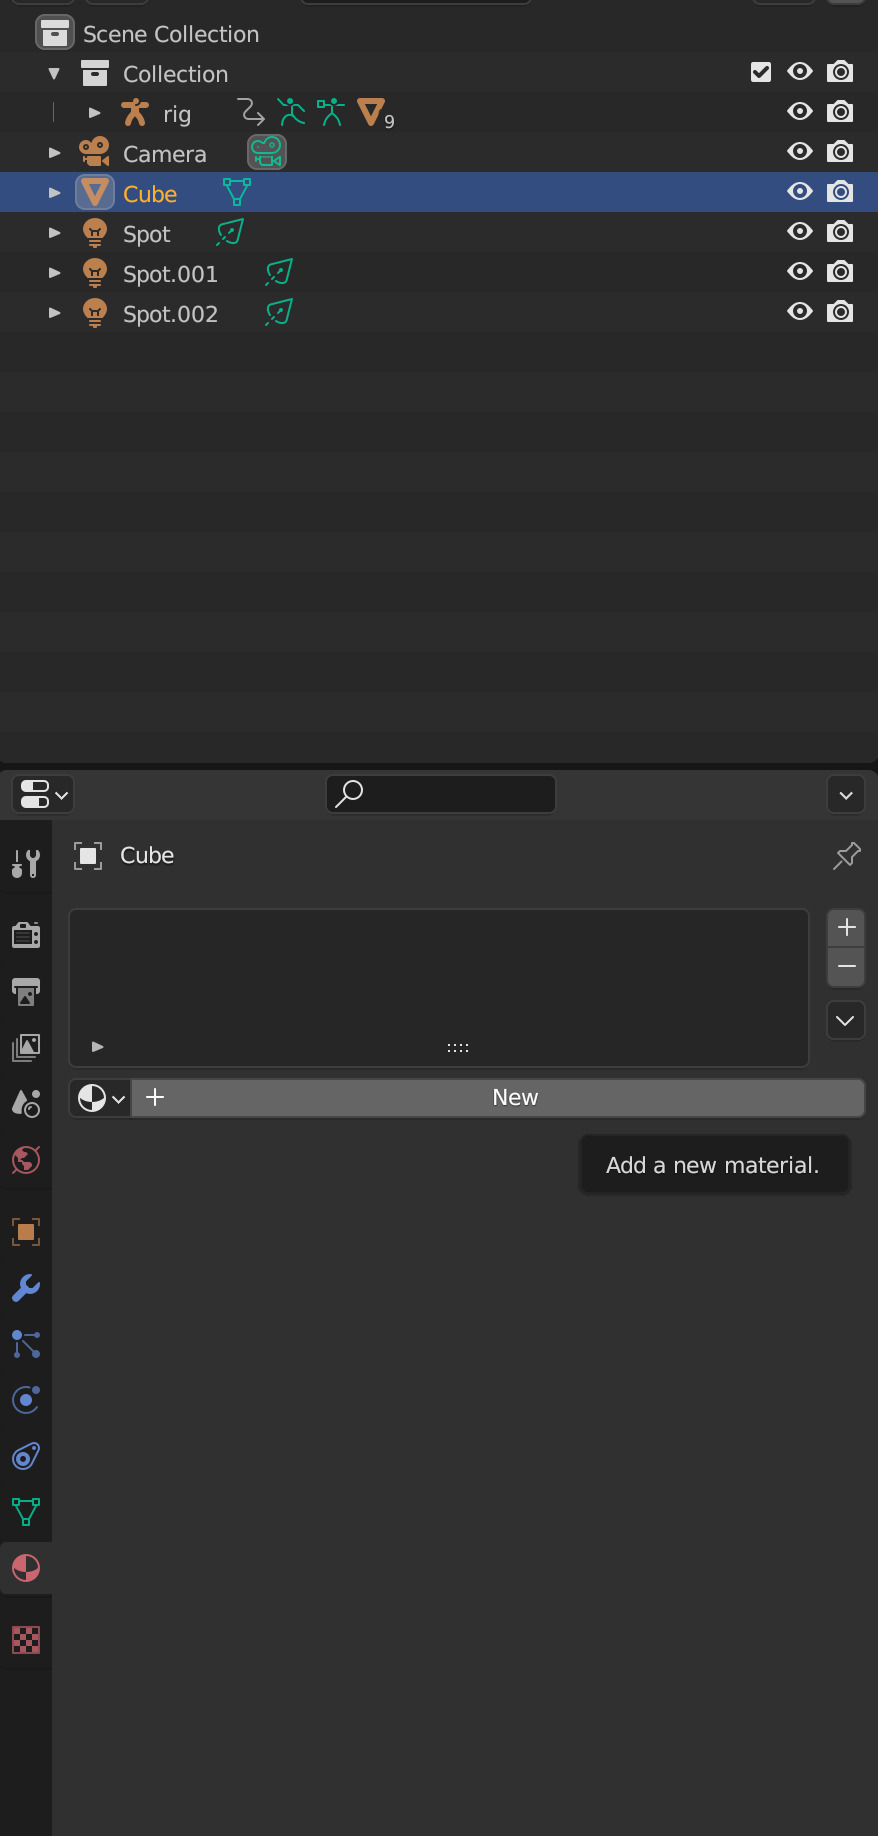
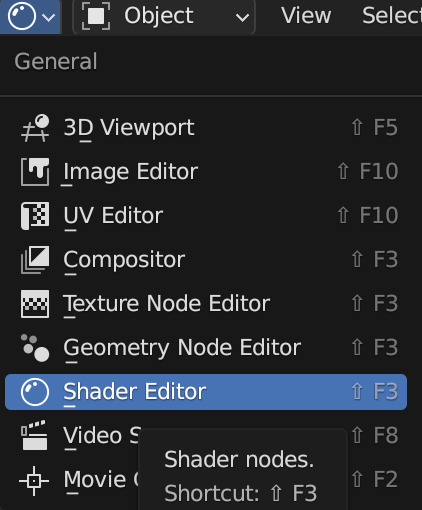
This is looking better, and you can see where my lights are and how they're oriented Now let's adjust the background Select your cube in the Outliner panel and navigate to Material Properties Click "new" in the bar Then navigate to your Shader Editor window and you'll see a Principled BSDF Node is here
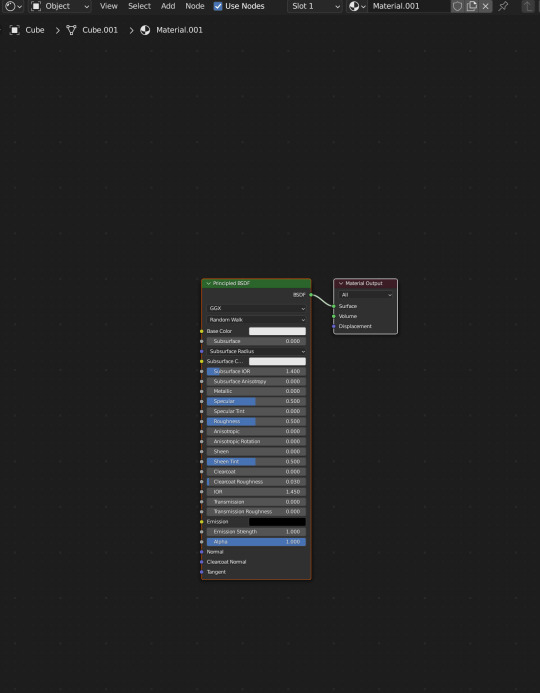
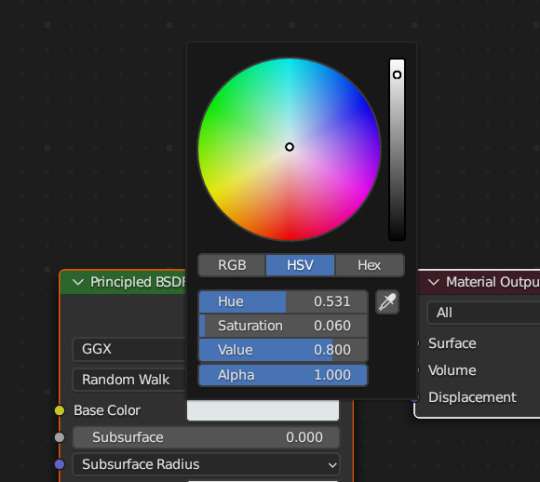
We're not going to do anything too fancy here, just change the color of the cube and some aspects of how it looks Change the color of your box using the color wheel then adjust your nodes to everything is set to zero except roughness
You should have something like this (of course use whatever color compliments your sim best)
I don't want the background to be super flat, so I'm going to adjust the Metallic value on mine Now I have this:
I like the lighting but I think it might be a little too bright Let's adjust it a little In your Outliner panel, select one of the spotlights then go to "Object Data Properties" (the little lightbulb)

I'm going to adjust the Power to 5 and click off multiple importance and click on shadow caustics, like this:
Do the same for all three spotlights and you should have something like this:
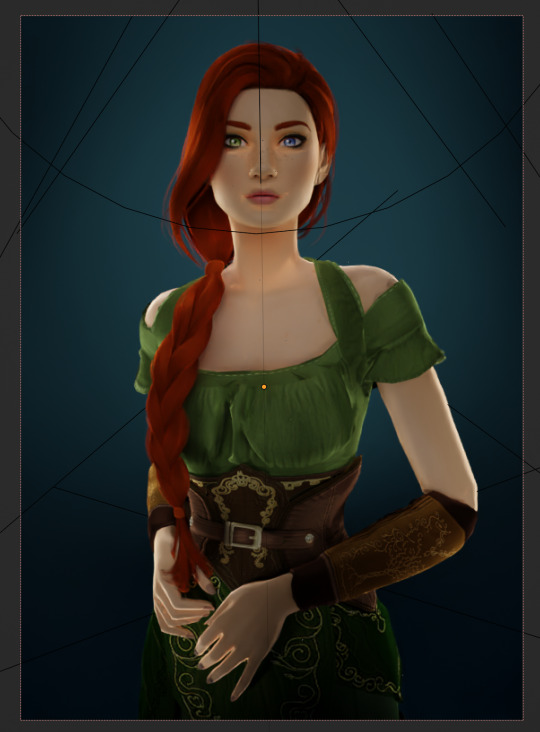
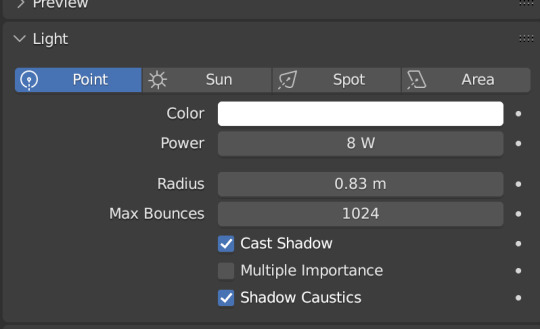
That's better, but let's draw attention to her face with a Point light Add in a point light the same way as a spot (shift+A, light -> point) or Add in the top bar) and move it in front of her face
This is obviously way too bright, so let's adjust it like we did for the spotlights I've changed the radius and adjusted the power to 8, as shown here:
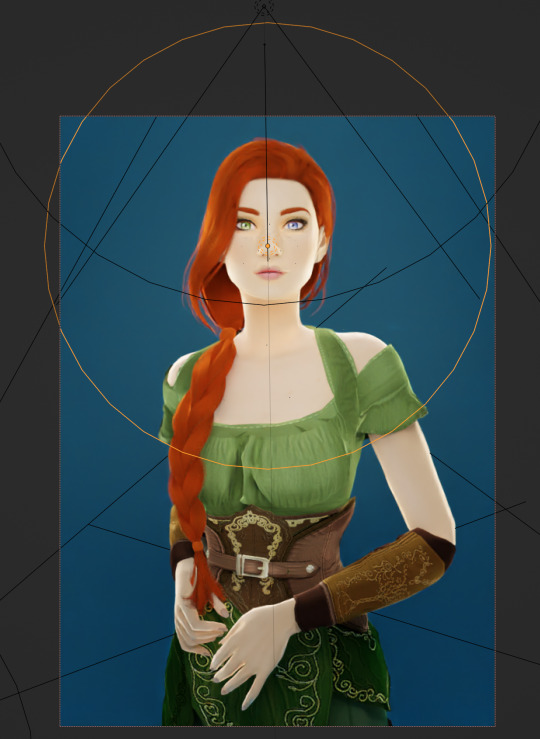
Here's the result:
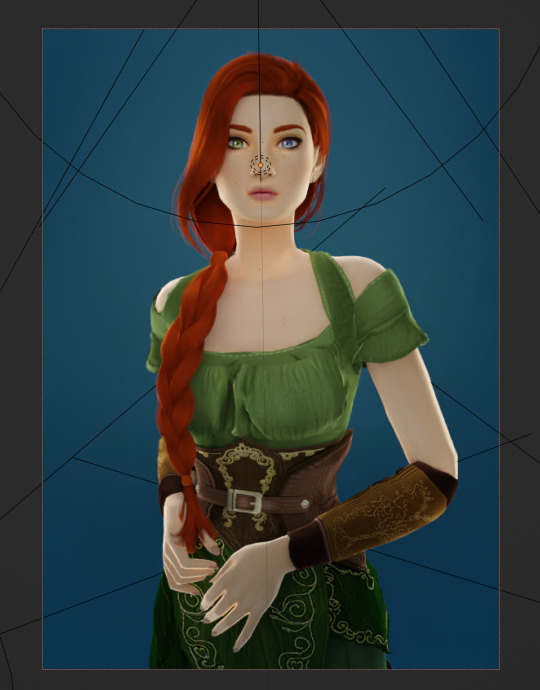
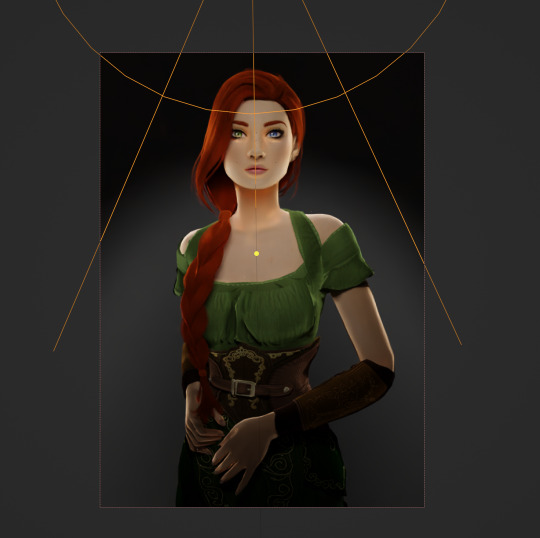
That's much better! Normally at this point I would probably change her hair and add in jewelry and make minor adjustments to this and that, but for the sake of this super simple beginner render, we're ready to go! Before you run your render, save this file somewhere easy to find. I'll be using the same file for future tutorials!
Step 3: Rendering!
Once you've done all the setup, rendering is actually super easy Make sure you switch your 3D viewport back to Material Preview (rendering while in rendered mode has a tendency to make blender crash) Then go up to the navigation bar and select Render -> Render Image
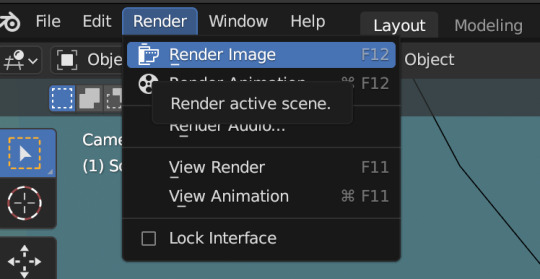
A new window will pop up, and your render will begin!
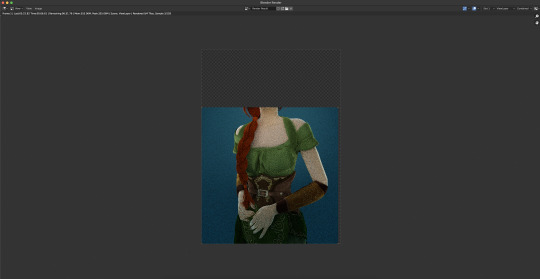
Rendering time will depend on how complex your scene is and how many assets you've added in. Ours is very simple so mine says it'll take about 6 minutes
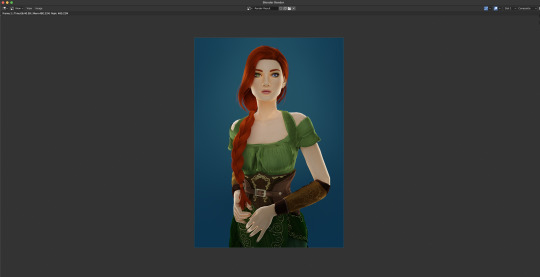
And it's done! Save your render and either post it or edit it in your favorite photo editor!
UPDATE 7/17/23
As you can see, my render was looking very glowy. I didn't know why (there was no glare node in the compositing settings or anything that would cause this, or so I thought), until I adjusted the roughness values on my sim.
Now it looks like this:
So if yours is looking glowy, adjust the roughness to 0, then back up to 10 and that should fix it!
Homework:
Your Render School homework is to create a simple portrait render using these tutorials and tag me in it! I can't wait to see what yall make!
Please leave any questions in the comments below or send an ask and I'll help as best I can!
Happy Rendering!
#salemsims tutorial#render school tutorial#sims 4 render#tutorial#sims 4 blender tutorial#blender#render tutorial#sims render tutorial
64 notes
·
View notes
Note
Found your work. You inspired me to take another shot at technical art and graphics programming. Do you recommend any specific resources for getting started and beyond?
Thanks so much! Really glad I could inspire you to do that bc graphics and tech art things are so much fun :D
(Also sorry for the late response. I've been a bit busy and was also thinking about how I wanted to format this)
I'm mostly self taught with a lot of stuff and have done lots of research on a per-project basis, but Acerola and Freya Holmer are two of my favorite channels for learning graphics or technical art things. Shadertoy is also an amazing resource to not only create and view other's shaders, but learn about algorithms and see how people do things!
While I don't have many general resources. I'll steal these resources for graphics programming that Acerola shared in his discord server:
For getting started with graphics engine development: DX11: https://www.rastertek.com/tutdx11s3.html OpenGL: https://learnopengl.com/ DX12: https://learn.microsoft.com/en-us/windows/win32/direct3d12/directx-12-programming-guide Vulkan: https://vulkan-tutorial.com/
For getting started with shaders: catlikecoding: https://catlikecoding.com/unity/tutorials/rendering/ the book of shaders: https://thebookofshaders.com/ daniel ilett's image effects series: https://danielilett.com/2019-04-24-tut1-intro-smo/
For getting started with compute shaders: Kyle Halladay: http://kylehalladay.com/blog/tutorial/2014/06/27/Compute-Shaders-Are-Nifty.html Ronja: https://www.ronja-tutorials.com/post/050-compute-shader/ Three Eyed Games (this one teaches ray tracing AND compute shaders, what a bargain!): http://three-eyed-games.com/2018/05/03/gpu-ray-tracing-in-unity-part-1/
I also wanted to talk a little bit about I do research for projects!
A lot of my proficiency in shaders just comes from practice and slowly building a better understanding of how to best utilize the tools at my disposal, almost like each project is solving a puzzle and I want to find the most optimal solution I can come up with.
This is definitely easier said than done and while a lot of my proficiency comes from just doodling around with projects and practicing, I understand that "just practice more lol" is a boring and kinda unhelpful answer. When it comes to projects like my lighting engine, I came up with a lot of the algorithm stuff myself, but there were certainly lots of details that I learned about from past projects and research like ray marching (calculating the ray intersection of a distance function) and I learned about the jump flood algorithm from a tech artist friend (calculating distance functions from textures)
Each new algorithm you learn in various projects ends up being another tool in your toolbox, and each project becomes a combination of researching new tools and applying the tools you've learned in the past.
One last example. I made a Chladni plate simulation in blender (that thing where you put sand on a metal plate and play noises and it makes patterns) and it started with me researching and looking up chladni plates, I watched youtube videos related to why the sand forms the patterns it does, which ended up being due to how the sound waves displaced the plane. I googled some more and found the actual equation that represents it, and used it to simulate particle motion.
Figure out some projects you want to do and just do some googling or ask for help in game dev discord servers or whatever. Lot's of research on a per-project basis is honestly how you'll learn the most imo :3
39 notes
·
View notes
Note
Hello, hope you're doing well!
I don't really know where else to ask this, so sorry if this is annoying. I have seen your beautiful TS3 posts and It's making the craving I've had to play it for months even stronger lol
The problem is, no matter what I do I can't seem to get it to run without major lag/stuttering. I have a fairly decent computer with 16gb of RAM, and have followed all the steps I've seen on forums (Nrass mods and MCcc for cleaning up a save, lazyduchess' smooth patch etc.) and no matter what, it stutters. Sims 3 was my first sims game, so I know the usual amount of lag to have and what it's doing now isn't the usual normal amount; I can tell for some reason it's struggling to run smoothly and at the point it's at it's unplayable :(
Do you have any more tips that I could possibly do to get it to run? I feel so nostalgic for it :'(
Having a good amount of computer memory helps for sure, but the biggest help when it comes to games and smooth performance is your GPU memory, and the type of drive you’ve got the game installed on.
For The Sims 3 I think the minimum spec used to be 2gb, but I like to think these days 4gb-6gb GPU would be a better soft entry for it, esp if you plan to play with all packs, CC, and possibly an HQ mod. For storing the games files, I highly recommend installing it on an SSD ( Solid State Drive ), it’ll load things like objects and textures a lot quicker ( so long as it isn’t CC ), and you’ll get less pop ins, and waiting for stuff to render properly.
Now if you’ve got everything above, and are still getting lag without CC. Make sure the game recognizes your card, if this hasn’t been done the game isn’t properly using it. It would’ve been a step included in that one Steam Community tutorial I linked. The other thing is, esp if you’ve got a more powerful GPU, is to force fps ( frames per second ) to cap at 60 fps. This is so crucial bc The Sims 3 doesn’t have Vsync, it’s old as hell, if you’re running a brand new card, you’ll be pushing astronomical frame rates which is risky, and you’ll need to cap this through your GPU’s settings app, but doing it will save your GPU a lotta stress, and also stabilize The Sims 3’s performance, or any game for that matter.
Now if you’ve got everything above, and are still getting lag with CC. Especially if you’ve got a lot of it, there are ways to mitigate this. Try looking up tutorials on how to merge CC, and then to minimize load times, try using programs like Bulk Rename Utility to remove any spaces and special characters in CC file names. You want less than 100 files in your entire CC/mods folder, merging will help achieve this if you’ve got a lot of CC. I’ve got almost 30gb of CC, and my game takes like a minute and a half to load to menu.
Lastly just be sure your settings are set for your rig specifically, and honestly, even if your PC is powerful, things like high detail trees, and super water isn’t necessary, those settings will look fine ticked down a bit.
21 notes
·
View notes
Note
I'm sorry I'm too shy to ask without being anonymous, but how are you making your AI friend? Are you using specific application or coding it from scratch?
You inspired me to maybe make my own, but I have no idea where to even start... (╥﹏╥)♡
no need to be sorry!! i've been hyperfixed on this kinda stuff recently so i'll love to share lul ( ◕‿‿◕ )
i've been coding the AI application for it to store memory and customize the prompt more, but the basic program to run the AI itself is ollama! you can just run that program on its own in ur computer terminal and download any model u want ^w^ i personally use huggingface to find new models to run, especially if ur looking for uncensored ones they got those!
your PC specs determine what models can run the best locally tho, since its not like c.ai or chatgpt there's no servers but ur own device running and generating replies, the more RAM u got and the better ur CPU and GPU is means u can run bigger models and run especially the smaller ones faster
if ur wanting to make something that runs in its own application like i've been setting up here you'll have to code it on ur own ;w; i personally have just started learning python so my process has been a mix of trial and error, following tutorials and using the copilot AI feature in VSCode to help explain things and troubleshoot errors and stuff i dont understand
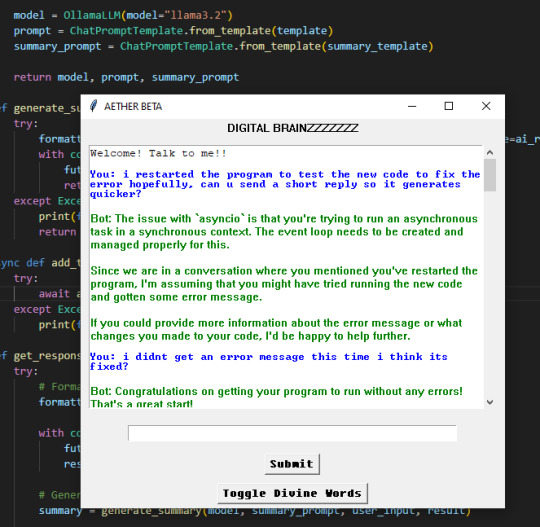
if u wanna start coding i highly recommend using VSCode since u can code in many other languages and its got useful features for debugging and stuff ^3^
the video tutorials i watched were these two, both use ollama and show u how to set it up but the 2nd one shows u how to set up the basic code for the chatbot that i used to build off of to make what i got rn
♡ Run your own AI (but private) | NetworkChuck ♡
♡ Create a LOCAL Python AI Chatbot In Minutes Using Ollama | Tech With Tim ♡
i hope this helps!! i personally just rlly like learning new stuff and like tech too much so i took the more complicated route than going on something like janitorai or c.ai (c.ai was so much better when it first came out ong) to make a custom bot xD
#‧₊🐾˚⊹ my stuff#‧₊💌˚⊹ anons & asks#ai bots#posicblr#posic#jiraiblr#objectum#jiraiblogging#jiraiposting#landmineposting#landmineblogging#landmineblr#neetblr#hikkineet#irl jirai#irl neet#hikkigirl#hikkikomori#artificial intelligence#ai chatbot#landmine jirai#jirai girl#landmine type#internet angel
6 notes
·
View notes
Note
Do you know what old pc I should get for retro gaming?
Thanks for the question! Keep in mind that this is written from the assumption that you have no/very basic knowledge of older computers, so I apologize if this comes off a bit patronizing! Even if you know quite a bit, other people reading may not and I want to make sure people are knowledgeable before making a purchase!
If you dont care about hardware, and your current pc can handle it, I'd recommend setting up a VM with the operating system of your choice (windows xp would probably have the most flexibility). Look up a tutorial on how to set up a VM with VirtualBox, and you can easily find .iso files of your operating system of choice online. (Obviously be careful of what you download). This is also convenient because if you dont own physical copies of your games it's pretty easy to get the files from the internet archive and transfer them to the VM! If you need any more help with this, feel free to send me an ask and I can help you out!
If you're a hardware lover like me though, I definitely understand wanting to have the experience of the real thing! Please keep in mind im not totally educated about specs and technical stuff, so take my opinion with a grain of salt and look for others input as well (followers please add on / correct me)!
A lot of it depends on the kind of games you want to run, if you're fine with only 2d games you should be fine with most computers that have an appropriate cpu/ram for the year it was made! However, running 3d games will definitely need a good gpu. There are plenty of people on ebay who sell custom built computers geared towards retro gaming, I'd recommend looking into listings of those even if you do not want to buy on eBay just to get an idea of what you would like!
I personally use Facebook marketplace to look for old computers that I want to buy. A lot of times you can get pretty good deals on there! While not a gaming oriented computer, I got my micron millennia, including the crt monitor, keyboard, mouse, and speakers all for $80! It also runs pretty much any games I want to play on there, but I haven't tried any beefier 3d games yet so I'm not sure how it will do with those. You can also check local thrift stores around you as well, I've been able to find a Dell optiplex for $40 once before. I would recommend local shops rather than goodwills since most goodwills usually sell their good stuff online for auction, but it doesn't hurt to check if you're feeling lucky!
Keep in mind that buying locally very much depends on if you can drive/have access to a car, so I totally understand if this isn't an option for you. I also have only ever lived in the US so your buying options will probably be different if you are in another country. If you know of any local retro tech enthusiast groups, they could probably help you out specific to your location! Again, Facebook is a good resource to find local groups.
The other option is buying from eBay. It will be more expensive because of shipping but you can at least get something more geared to your specifics and it's more convenient if you do not have access to transportation. Searching up something like "custom retro gaming pc" or "vintage gaming pc" should help you out!
Also, if this is your first time buying an old computer, or you do not have any experience with technology repair, you may want to buy from someone who has that experience and has already refurbished the computer for you. Blown capacitors and shitty power supplies are no joke, they can be very dangerous! If you absolutely need a computer that is advertised as not working/not tested, take it to someone who knows what they're doing before plugging it in. Again, I apologize if this comes off as patronizing but I want to make sure everyone is safe and no one has any bad experiences that may turn away people from this hobby!
Another recommendation I'd give is to get something you like! I know this might be a bit obvious, but I really like windows 98 because of nostalgia reasons, and my roommate would often ask me why I didn't get a pc with windows XP. Personally all the games I want to play run fine on 98, and i'm willing to use a VM for games that need XP. Get something that makes you happy if it is within your budget and convenient for you!
I apologize if this is a bit rambly! I'm waiting for an oil change and im bored lol. Other people feel free to add on and im willing to answer more questions if needed :)
45 notes
·
View notes
Note
Hi darling! What pc/computer do you use for play the sims? I have an old one and I’m looking for good advices for buy a new one!!
Hello, my husband custom built mine but here are the specs! (I hope they help since I don't know anything about tech) I absolutely love mine though so if you're willing to build one yourself, (there are some tutorials I've seen on youtube) I'd highly recommend doing that!
cpu: intel core i5 - 9600KF
ram: 16gb memory
gpu: nvidia geforce gtx 1080ti
ssd: 1tb
monitor: hp m22f 21.5 inch
39 notes
·
View notes
Text
Intel VTune Profiler For Data Parallel Python Applications

Intel VTune Profiler tutorial
This brief tutorial will show you how to use Intel VTune Profiler to profile the performance of a Python application using the NumPy and Numba example applications.
Analysing Performance in Applications and Systems
For HPC, cloud, IoT, media, storage, and other applications, Intel VTune Profiler optimises system performance, application performance, and system configuration.
Optimise the performance of the entire application not just the accelerated part using the CPU, GPU, and FPGA.
Profile SYCL, C, C++, C#, Fortran, OpenCL code, Python, Google Go, Java,.NET, Assembly, or any combination of languages can be multilingual.
Application or System: Obtain detailed results mapped to source code or coarse-grained system data for a longer time period.
Power: Maximise efficiency without resorting to thermal or power-related throttling.
VTune platform profiler
It has following Features.
Optimisation of Algorithms
Find your code’s “hot spots,” or the sections that take the longest.
Use Flame Graph to see hot code routes and the amount of time spent in each function and with its callees.
Bottlenecks in Microarchitecture and Memory
Use microarchitecture exploration analysis to pinpoint the major hardware problems affecting your application’s performance.
Identify memory-access-related concerns, such as cache misses and difficulty with high bandwidth.
Inductors and XPUs
Improve data transfers and GPU offload schema for SYCL, OpenCL, Microsoft DirectX, or OpenMP offload code. Determine which GPU kernels take the longest to optimise further.
Examine GPU-bound programs for inefficient kernel algorithms or microarchitectural restrictions that may be causing performance problems.
Examine FPGA utilisation and the interactions between CPU and FPGA.
Technical summary: Determine the most time-consuming operations that are executing on the neural processing unit (NPU) and learn how much data is exchanged between the NPU and DDR memory.
In parallelism
Check the threading efficiency of the code. Determine which threading problems are affecting performance.
Examine compute-intensive or throughput HPC programs to determine how well they utilise memory, vectorisation, and the CPU.
Interface and Platform
Find the points in I/O-intensive applications where performance is stalled. Examine the hardware’s ability to handle I/O traffic produced by integrated accelerators or external PCIe devices.
Use System Overview to get a detailed overview of short-term workloads.
Multiple Nodes
Describe the performance characteristics of workloads involving OpenMP and large-scale message passing interfaces (MPI).
Determine any scalability problems and receive suggestions for a thorough investigation.
Intel VTune Profiler
To improve Python performance while using Intel systems, install and utilise the Intel Distribution for Python and Data Parallel Extensions for Python with your applications.
Configure your Python-using VTune Profiler setup.
To find performance issues and areas for improvement, profile three distinct Python application implementations. The pairwise distance calculation algorithm commonly used in machine learning and data analytics will be demonstrated in this article using the NumPy example.
The following packages are used by the three distinct implementations.
Numpy Optimised for Intel
NumPy’s Data Parallel Extension
Extensions for Numba on GPU with Data Parallelism
Python’s NumPy and Data Parallel Extension
By providing optimised heterogeneous computing, Intel Distribution for Python and Intel Data Parallel Extension for Python offer a fantastic and straightforward approach to develop high-performance machine learning (ML) and scientific applications.
Added to the Python Intel Distribution is:
Scalability on PCs, powerful servers, and laptops utilising every CPU core available.
Assistance with the most recent Intel CPU instruction sets.
Accelerating core numerical and machine learning packages with libraries such as the Intel oneAPI Math Kernel Library (oneMKL) and Intel oneAPI Data Analytics Library (oneDAL) allows for near-native performance.
Tools for optimising Python code into instructions with more productivity.
Important Python bindings to help your Python project integrate Intel native tools more easily.
Three core packages make up the Data Parallel Extensions for Python:
The NumPy Data Parallel Extensions (dpnp)
Data Parallel Extensions for Numba, aka numba_dpex
Tensor data structure support, device selection, data allocation on devices, and user-defined data parallel extensions for Python are all provided by the dpctl (Data Parallel Control library).
It is best to obtain insights with comprehensive source code level analysis into compute and memory bottlenecks in order to promptly identify and resolve unanticipated performance difficulties in Machine Learning (ML), Artificial Intelligence ( AI), and other scientific workloads. This may be done with Python-based ML and AI programs as well as C/C++ code using Intel VTune Profiler. The methods for profiling these kinds of Python apps are the main topic of this paper.
Using highly optimised Intel Optimised Numpy and Data Parallel Extension for Python libraries, developers can replace the source lines causing performance loss with the help of Intel VTune Profiler, a sophisticated tool.
Setting up and Installing
1. Install Intel Distribution for Python
2. Create a Python Virtual Environment
python -m venv pyenv
pyenv\Scripts\activate
3. Install Python packages
pip install numpy
pip install dpnp
pip install numba
pip install numba-dpex
pip install pyitt
Make Use of Reference Configuration
The hardware and software components used for the reference example code we use are:
Software Components:
dpnp 0.14.0+189.gfcddad2474
mkl-fft 1.3.8
mkl-random 1.2.4
mkl-service 2.4.0
mkl-umath 0.1.1
numba 0.59.0
numba-dpex 0.21.4
numpy 1.26.4
pyitt 1.1.0
Operating System:
Linux, Ubuntu 22.04.3 LTS
CPU:
Intel Xeon Platinum 8480+
GPU:
Intel Data Center GPU Max 1550
The Example Application for NumPy
Intel will demonstrate how to use Intel VTune Profiler and its Intel Instrumentation and Tracing Technology (ITT) API to optimise a NumPy application step-by-step. The pairwise distance application, a well-liked approach in fields including biology, high performance computing (HPC), machine learning, and geographic data analytics, will be used in this article.
Summary
The three stages of optimisation that we will discuss in this post are summarised as follows:
Step 1: Examining the Intel Optimised Numpy Pairwise Distance Implementation: Here, we’ll attempt to comprehend the obstacles affecting the NumPy implementation’s performance.
Step 2: Profiling Data Parallel Extension for Pairwise Distance NumPy Implementation: We intend to examine the implementation and see whether there is a performance disparity.
Step 3: Profiling Data Parallel Extension for Pairwise Distance Implementation on Numba GPU: Analysing the numba-dpex implementation’s GPU performance
Boost Your Python NumPy Application
Intel has shown how to quickly discover compute and memory bottlenecks in a Python application using Intel VTune Profiler.
Intel VTune Profiler aids in identifying bottlenecks’ root causes and strategies for enhancing application performance.
It can assist in mapping the main bottleneck jobs to the source code/assembly level and displaying the related CPU/GPU time.
Even more comprehensive, developer-friendly profiling results can be obtained by using the Instrumentation and Tracing API (ITT APIs).
Read more on govindhtech.com
#Intel#IntelVTuneProfiler#Python#CPU#GPU#FPGA#Intelsystems#machinelearning#oneMKL#news#technews#technology#technologynews#technologytrends#govindhtech
2 notes
·
View notes
Text
Kaggle is an online community and platform for data scientists and machine learning enthusiasts. It provides tools, datasets, and competitions to help users learn, practice, and showcase their skills in data science. Below is a detailed review of Kaggle's features and functionalities:
Key Features
Competitions:
Machine Learning Competitions: Kaggle is renowned for its data science and machine learning competitions where users can compete to solve complex problems. Companies and research organizations often host these competitions, providing real-world datasets and significant prizes. Community Competitions: Besides corporate-sponsored competitions, Kaggle also allows users to create and participate in community competitions, fostering a collaborative and competitive learning environment.
Datasets:
Extensive Dataset Repository: Kaggle hosts a vast repository of datasets across various domains. Users can search, download, and explore these datasets for practice, projects, and competitions.
Dataset Tools: Kaggle provides tools for users to upload, share, and collaborate on datasets, making it easy to work with and explore data.
Kaggle Kernels:
Online Coding Environment: Kaggle Kernels (now called Kaggle Notebooks) is an integrated development environment (IDE) that allows users to write and execute code in Python or R directly on the platform without needing to set up a local environment.
Collaboration: Users can share their notebooks, collaborate on code, and learn from each other's work. The notebooks can be forked, making it easy to build on existing work.
Free Compute Resources: Kaggle provides free access to GPUs and TPUs for running machine learning models, making it accessible for users without powerful local hardware.
Learning Resources:
Courses: Kaggle offers a variety of free courses on data science, machine learning, and artificial intelligence. These courses are designed to help users of all levels, from beginners to advanced practitioners, develop their skills.
Tutorials and Notebooks: The community-driven tutorials and notebooks provide practical examples and insights on various data science topics, helping users learn through real-world applications.
Community:
Forums: Kaggle has an active forum where users can discuss problems, share insights, and seek advice on data science topics and competition strategies.
Ranking and Badges: Users earn points and badges for participating in competitions, contributing to datasets, and publishing notebooks, which helps build their profile and reputation within the community.
Projects and Collaboration:
Team Competitions: Users can form teams to participate in competitions, allowing for collaborative problem-solving and knowledge sharing.
Public and Private Projects: Kaggle supports both public and private projects, enabling users to work on personal projects or collaborate with select team members in a private setting.
Pros Comprehensive Learning Platform: Kaggle provides a wide range of resources, from datasets and competitions to courses and community support, making it an all-in-one platform for learning data science.
Real-World Problems: Competitions and datasets often reflect real-world challenges, providing valuable practical experience.
Free Compute Resources: Access to free GPUs and TPUs for running models is a significant advantage for users without high-end hardware.
Community and Collaboration: The active community and collaborative tools enhance learning and problem-solving through shared knowledge and teamwork. Professional Recognition: Success in Kaggle competitions and active participation can enhance a user’s profile and credibility in the data science field.
Cons High Competition: The competitive nature of Kaggle can be daunting for beginners, as many competitions attract highly skilled participants.
Learning Curve: While Kaggle provides numerous resources, the vast array of tools, datasets, and competition formats can be overwhelming for new users.
Variable Quality of Datasets and Notebooks: The quality of user-uploaded datasets and notebooks can vary, requiring users to critically evaluate and choose reliable sources.
Kaggle is an exceptional platform for anyone interested in data science and machine learning, offering a robust set of tools, resources, and community support. Its combination of competitions, datasets, and educational content makes it suitable for both learning and practicing data science skills. While the competitive environment and extensive resources may present a learning curve, the benefits of practical experience, community collaboration, and access to free computational resources make Kaggle a highly valuable platform for aspiring and experienced data scientists alike.
4 notes
·
View notes
Text
Every time I try to mod my PC I run into stupid issues.
The very first time I built a PC in 2020-2021, it got damaged over shipping, so I had to replace like half the parts. Yes it took so long that it bled into the new year.
This time I just wanted to add a graphics card and change to a better coolant. Cue...
Spending an entire hour panicking because all of the tutorials for how to install the coolant were mentioning parts I didn't have. Reviews also mentioned missing parts.
Spending another ten minutes of relieved sighing when I talked to my brother in law and he said this setup doesn't even need those extra parts that reviewers said were "missing". Further supported by the fact that I did indeed find the instruction manual online (because the reviewers were right about one thing; this piece of shit did not come with instructions).
Realizing that graphics cards require a lot of computing power, which means it needs to be attached to the power supply (duh).
Spending another hour digging through an old box of PCU cables to see if there's any compatible ones. There isn't. Which is another duh moment because the PSU I currently use isn't the same as the box of cables.
Spending another half hour Googling around trying to understand different power supply cables. Coming to the realization that PSUs have no fucking standards.
Deciding to buy the right cable on Amazon. Reads reviews about shit catching on fire.
Coming to the conclusion that I should just buy a new PSU. ($50, fine.)
Doing a double take because I thought it would arrive by this Saturday (so in two days). Nope, it's arriving next Saturday (i.e., in 10 days).
Packing my coolant and GPU up with a heavy heart.
It is now 8 pm, 6 hours since I started this journey today. I have decided to eat instant cup ramen for dinner.
3 notes
·
View notes